|
In This Issue:
|
| Less Troubleshooting |
| "Easy to Fix" |
|
|
|
|
|
|
|
|
|
|
|
|
|
|
|
|
|
|
|
|
| Greetings to our Atomic 4 customers, and welcome to our Spring 2011 email newsletter. We have compiled the following information that we hope you find helpful. For a complete listing of our Atomic 4 parts & services, you may visit www.moyermarine.com or call Ken at our phone parts line, 610-421-4436. |
| Setting the stage for less (and/or) easier troubleshooting |
It's difficult to know for sure, but we estimate that each hour spent in a well devised preventative maintenance program can easily save 6 hours in troubleshooting a problem after the fact of a failure. The following suggestions are intended to augment (not replace) whatever preventative maintenance activities you're already performing throughout the year. A few of the items may stretch the aforementioned 1 for 6 hour rule (cleaning a fuel tank comes to mind), but our honest aim was to come up with a relatively small list of items that will provide the biggest reliability dividend for the least amount of time spent.
IGNITION: How a good secondary arc is delivered to each of the spark plugs in exactly the correct timing sequence is usually the least understood system on the engine (particularly the concept of induction itself which is the heart of the ignition system). Therefore, the following suggestions will make a lot more sense if you review our Ignition video for a more solid technical understanding of your ignition system.
1) Primary 12 volt ignition circuit (the part on the boat, external to the engine): Check all terminals, fuses, and switches within this circuit for corrosion or other signs of a faulty connection. This part of the primary circuit starts at the large battery terminal on the starter solenoid and then runs through the ignition switch and back to the positive terminal of the coil. The simplest way to check electrical connections and switches is to have an assistant hold a voltmeter between the positive terminal of the coil and ground while you tap each connection (and switch) with the plastic end of a screwdriver while the ignition switch is “ON”. Any defective connection will usually cause the voltmeter to flicker whenever you tap on that particular connection.
2) Primary circuit (the part on the engine): This is the small part of the 12 volt primary circuit which extends from the negative terminal of the coil to ground by way of the points or an electronic ignition module. As with the rest of the primary circuit, check this small section for faulty connections AND that the contacts of the points are polished using a small piece of cardboard (match book cover or the back of a tablet). Obviously, if you've installed electronic ignition, there will be no points to check.
NOTE: In terms of engine reliability, there's no circuit in the boat that's more important than the primary ignition circuit. Approximately 90% of all ignition problems occur within the primary circuit . If you can't follow this entire circuit, you should give serious consideration to rerouting it so that you can. There should be no buried connections in this circuit, and if it's necessary to run the circuit behind bulkheads or under the cabin sole, a conduit should be provided so that the wire can be replaced easily if necessary.
3) It would be a good practice at this point to check the strength of the secondary discharge by removing the secondary coil lead from the middle of the distributor cap and holding it a short distance from the head while you manually open and close the points (with the ignition switch “ON”). Each time you open the points (you can use your thumb nail or a small screwdriver) you should observe a good secondary discharge between the end of the coil lead and the head (1/2” or longer). The quicker you can open the points, the stronger the secondary arc will be. In the case of electronic ignition, you'll have to turn the engine over with the starter to make and break the primary circuit to perform this check. Assuming that the primary circuit is in good repair, a weak secondary discharge in this test would be a good indication that the coil itself is weak.
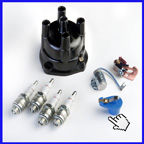
4) The secondary ignition system: The secondary ignition system handles the high voltage discharge that comes from the top of the coil and ends up finally jumping across the electrodes of the spark plugs. This part of the system includes the coil itself, the distributor cap, the rotor, all plug (and coil) wires, and the spark plugs. All these components should be checked for cracks, fouling, or any other sign of mechanical damage. Oil filled coils should also be checked for any sign of rust or oil leak. Within the secondary system, spark plugs are the most frequent component to become problematic, but when spark plugs foul, it will usually be the result of some other problem (most frequently a rich fuel mixture, elevated exhaust back pressure, or low compression).
5) If you're performing these checks after maintenance work has already been accomplished on the ignition system, be sure that the plug leads have been reinstalled in the proper firing order (1,2,4,and 3), and that the timing has been rechecked under load at your favorite cruising power setting (slowly rotating the distributor to find the spot of best RPM).
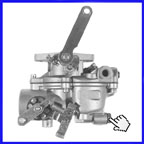
FUEL: As a sequel to reliable 12 volts DC getting to the coil eliminating most ignition problems, when squeaky clean fuel is delivered to the carburetor at a pressure of 2 to 4 psi, engine problems related to fuel issues are practically eliminated:
1) After any layup of more than several months, or at any other time you suspect issues may be developing in your fuel supply system, remove the main passage plug and pump several pints of fuel through your entire fuel system and out through the bottom of the carburetor. This simple procedure will flush any moisture or crud out of your system before it has a chance to cause problems. The priming lever on mechanical fuel pumps is a convenient way to pump fuel through the system. A priming bulb can also be used. Electric fuel pumps will need to have the oil safety switch equipped with a jumper wire so that they will operate whenever the ignition switch is turned on. If you perform no other fuel system checks, this single item will go a long way to preventing fuel related problems.
NOTE: If crud continues to come from the fuel tank itself, it may be the case that water had been allowed to collect in the bottom of the tank during a long lay-up until bacterial slime developed in the water. Interestingly, there is a strain of hydrocarbon bug that live in the water and feed on the gasoline until the water itself becomes full of bacterial slime that has the potential to mechanically mix with the fuel while moving through heavy sea conditions. In worst cases, this watery bacterial muck will develop a very distinct stenchy odor over the period of several years. If it's impossible to remove or even access your tank for cleaning, you may be able to find a tank cleaning service in your area that's equipped to pump out the fuel to be replaced, or to aggressively be re-circulated back into the tank while filtering out the crud.
2) Remove the flame arrestor housing and make sure the choke valve closes completely when the choke knob is pulled in the cockpit. Because of the updraft design of the carburetor, hard starting will almost always result if the choke valve does not close completely.
3) Recheck the idle fuel mixture and try to adjust it in the lean direction as far as possible (in a counterclockwise direction) that will still retain good solid idle performance. Unless you routinely cruise in the neighborhood of 2000 RPM or above, the idle system will add a small amount of fuel to that which is coming through the main discharge nozzle. We have had quite a few reported cases where sooty plugs have actually cleaned up following a readjustment (slight leaning) of the idle mixture.
MECHANICAL: Old timers frequently speak of the three things needed for an engine to start and run as being spark, fuel, and compression. We've chosen the more general term of “mechanical” as a heading for this article rather than “compression” so that we can include the other important aspects of the engine's ability to breath in air and get rid of its exhaust later in this section:
1) Compression: Although an Atomic 4 will usually start even if compression drops as low as 50 or 60 psi on all cylinders, 80 to 85 psi is usually necessary to provide adequate performance on most sail boats in the Atomic 4 fleet. A simple “thumb test” will confirm whether or not you have adequate compression. If you can't contain the compression in each cylinder with your thumb while someone cranks the engine over on the starter, you should have adequate compression. If you can contain the compression in any of the cylinders with your thumb, you don't have adequate compression - at least not in that particular cylinder.
NOTE: If compression is low after a lengthy lay-up, try squirting 5 or 6 squirts of Marvel Mystery Oil (MMO) into each cylinder (aiming it away from the manifold side of the engine). In many cases, normal compression can be restored after the MMO has a chance to free up rings and valves.
2) Exhaust system: Some of our most enthusiastic feedback comes from folks who report greatly improved engine performance after having removed a restriction from their exhaust system. Here is a short list of the most frequent causes of elevated exhaust back pressure:
- Large deposits of mineral/carbon build up within their hot section, usually in the immediate area where the engine cooling water is introduced into the system.
- Collapsed inner lining of the rubber exhaust hose, usually several feet downstream from the water lift muffler.
- Peaks and valleys within the exhaust hose leading from the water lift muffler to the transom of the boat. These valleys present themselves as small “water lift” devices and create additional back pressure.
NOTE: The votes are not quite all in on this point, but we believe that in cases where peaks and valleys are necessary due to some unique boat design; 2” hose might be more problematic than slightly smaller ID hose (1 5/8” for example). The additional velocity within the smaller hose seems to move the engine cooling water through the system a bit more efficiently which apparently offsets the otherwise somewhat lower head loss of the larger hose.
3) Induction: Anything that restricts the engine's ability to take in air will have the same detrimental effect as a restricted exhaust. We don't mention this fact very often, simply because occasions of restricted intake air occur so seldom. The handful of cases we know of where engine performance did suffer due to limited induction air all related to someone setting a brief case or (other item) in such a place that blocked an air passageway into the engine compartment. If your engine compartment is very tight, be sure that you have at least a 6” diameter unrestricted opening or duct to supply air to the engine. Blowers installed to evacuate fumes from the engine compartment should not be installed in a duct through which the engine is trying to draw air into the compartment while it's running. |
|
No pressure on this one:
We continue to hear of folks using a city water supply when running an engine on the hard during a spring commissioning exercise. This is a very bad idea. Even if you try to valve the water pressure back to match what you think the engine water pump will inhale, you are at great risk of overpowering the exhaust system's ability to get rid of the water and it will flow back into the exhaust manifold as soon as you shut down (if not before). The preferred method is to valve the city water into a five-gallon bucket, and allow the engine pump to draw in the appropriate amount of cooling water from the bucket.
MMI's energy plan:
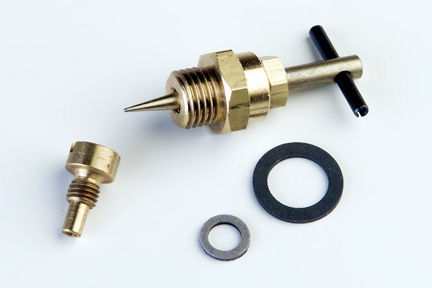
So far, both political parties in Washington are ignoring our suggestion that the government subsidize our adjustable main jets for free distribution to all Atomic 4 owners - or even considering a tax break on the purchase price.
In the meantime, given the modest cost of the adjustable main jet assembly, if you're planning on any significant amount of cruising this season (or anytime in the near future) you might want to consider the cost saving that adjusting your fuel mixture can provide. Many of our intracoastal cruising customers are able to achieve close to 1/2 gallon per hour fuel consumption by fine tuning their cruising fuel mixture. Relying on our pathetic math skills, that consumption would represent an average saving of 1/2 gallon per hour over the more common consumption of 1 gallon per hour, or 50 gallons saved for each 100 hours (at a conservative cost of $4.00 per gallon, this would put $200 less pressure on your cruising budget every 100 hours).
It ain't heavy; it's my engine:
If you're planning to remove your engine from your boat for heavy maintenance, you're invited to use our engine removal check list that appears from time to time on the Community Forum at moyermarine.com. The guide follows the traditional procedure of attaching the main sheet to the boom to hoist the engine. In following this part of the procedure, be sure to note the suggestion of reinforcing the boom by attaching the main halyard close to the point where the main sheet is attached when actually lifting the engine. If you have any concern as to the strength of your boom, you can attach the main halyard directly next to the main sheet which essentially neutralizes the weight of the engine on the boom.
Water Abatement:
While there are no o-rings in the Atomic 4 itself that are at risk due to Ethanol fuel, we have received several reports of o-rings in fuel fill caps that have deteriorated to the point that rain water and melting snow have been able to enter the fuel tank. We're not sure how to functionally test a fill cap without risking getting water into the tank, but from the failures that have come to our attention, visual inspection alone should enable you to predict whether or not your cap is water tight and if there's any doubt - you're better off to replace it.
Air Abatement:
While it’s a very good idea to periodically change your primary and inline fuel filters, please be aware that air will usually be introduced in the process which will prevent your engine from running reliably until all the air works through the system. We are receiving a growing number of reports from folks who have installed an electric fuel pump just upstream from the filter (between the filter and the tank) which they control with a separate manual switch. This system allows you to simply run the pump for a few minutes after replacing the filters to purge the air is out of the system and check for any leaks at the same time. The pump will click relatively quickly as fuel is replacing the air in the filter(s) and slow down when the air is gone. This second pump can also serve as an emergency back-up in case you suspect that your primary pump might have failed. |
|