|
|
|
In This Issue:
|
| Exhaust back pressure |
| Oil changing issues |
| Spring commissioning |
Do you know your
exhaust back pressure? |

Should you upgrade to
electronic ignition? |
|
| Greetings to our Atomic 4 customers, and welcome to our first email newsletter. In response to your overwhelming interest, we have compiled the following information that we hope you find helpful. For a complete listing of our Atomic 4 parts & services, you may visit www.moyermarine.com or call our phone parts line, 610.421.4436. You may also subscribe for future email newsletters on our website homepage. |
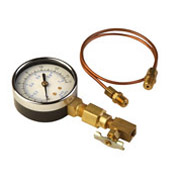
It's obviously difficult to know for sure, but given the number of engine issues showing up in recent years resulting from confirmed excessive exhaust back pressure, we believe that at least half of the Atomic 4 fleet may be suffering from some elevation of exhaust back pressure over the factory recommended range of 1 to 1.5 psi.
Many of the early symptoms of elevated exhaust back pressure (3 to 4 psi) mimic other conditions such as a rich fuel condition, low compression, poor ignition, or all of the above. Specific symptoms include uniformly sooty plugs, carbon build-up on valves and rings, caramelized goo on intake valve stems, and in worst cases (usually when back pressure exceeds 6 psi), one or two cylinders will refuse to fire.
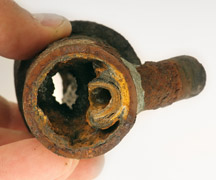
Two most common causes of elevated back pressure are mineral build-up in the hot section where the engine cooling water enters (see photo below), and the inner lining in the first several feet of the rubber hose on the discharge end of water lift mufflers breaking away from the rest of the hose and crumpling up on itself.
Measuring the back pressure at the exhaust manifold flange is the direct manner of determining whether or not you have a problem. Otherwise, if you have the symptoms and you've insured that the other causes are not present, it's probably time to remove your hot section for a look (the hard pipe between the manifold and the inlet to the muffler).
What may be new to many of you is the fact that when an engine is struggling for intake air, it will develop many of the same symptoms as restricted exhaust. In both cases, the smooth flow of air and exhaust through the engine is restricted. A very interesting recent case involving symptoms of elevated exhaust pressure (including sticky intake valves) turned out to be the result of setting a briefcase in the lazarette in such a manner as to block the 6" diameter vent between the engine compartment and lazarette. The lesson from this episode is simple: if your engine compartment is well sealed, be sure that the vent for the engine air supply is adequate and unrestricted. We don't have a lot of data regarding an exact vent size, but a 6" diameter vent appears to be adequate. Obviously, a severely clogged flame arrester element can cause the same "breathing" issue for an engine.
|
|
Universal recommended changing oil every 50 hours, or once a year (whichever comes first). This requirement seems simple enough to deal with, but for those of you relatively new to boating, the idea of having to pump oil out of an engine may seem rather strange. In the case of an Atomic 4, even if you could access the drain plug in the front corner of the oil pan on the starter side (presumably provided only to drain oil in the shop), you wouldn't be able to remove much more than a quart of oil, due to the fact that engines slant to the rear approximately 5 to 10 degrees on most sail boats.
To make things a bit easier, Universal designed the floor of the oil pan so that the transmission end angles upward at approximately 20 degrees with the engine sitting level. This means that even if an engine slants to the rear by 10 degrees in a boat, the floor of the transmission end is still sloping forward by approximately 10 degrees toward a low point near the center of the engine. A 3/4” pipe-threaded hole is provided in the top ledge of the oil pan directly over this low point (generally below the carburetor) to provide access for removing the oil from this location.
Early model engines were originally shipped with small piston pumps in these holes, but Universal discontinued this practice in late model engines and very few of the pumps remain today. You can find what we believe to be an even better alternative in our online catalog. Our oil change kit is built around a 3/8” pick-up tube which installs permanently in the pipe-threaded hole. A rubber hose connects the pick-up tube to whatever pump is currently being used to change oil. If no pump came with your boat, the two gallon blue vacuum can sold by West Marine is an ideal solution (I've used one for many years). If the engine is warmed up, the oil can be removed in a matter of minutes and carried off the boat in a virtually drip-free operation. The hose can be coiled up and attached to the side of the engine compartment between changes.
When changing oil in early and late model engines, no matter how many quarts you're able to remove, always fill with good quality detergent oil to the “Full” mark on the dipstick. If you have great difficulty reaching your dipstick, our dipstick extension tube kit will make your life easier in that regard. On early model dipsticks, the uppermost of the 4 reference marks equates to the "Full” mark on late model dipsticks. Any good quality 30 weight or 10W-30 multi-viscosity oil works well in most of our operating areas. Synthetic oil (though wonderful in modern automotive applications) is not recommended in engines with integrated clutch type transmissions (like our reversing gear). The high lubricity of these oils is prone to causing problems in keeping the forward clutch assembly from slipping.
|
|
|
|
This is the time of year many of us have been longing for. The time when approximately half of the 20,000 Atomic 4s estimated to be in active service will emerge from a winter lay-up. After spring commissioning, these engines will once again become vehicles of re-creation for their owners. As you might expect, we at MMI also look to this season as a time of renewal and try to make every spring a positive experience for our customers. Here are four simple checks which history has taught us will pay the biggest dividends for the time spent during this very busy time.
Pre-start checks: (all accomplished with the raw water through-hull closed):
1) OIL: Check oil and replace as necessary.
2) COMPRESSION: Remove all spark plugs and hold your thumb over each spark plug hole while turning the engine over a couple seconds. As long as compression is sufficient to force past your thumb no matter how hard you press, the compression is OK (80 psi or above). If any of the valves show signs of sticking (noticeably poorer compression), a few squirts of Marvel Mystery Oil will usually help those cylinders back to life.
3) IGNITION: While plugs are removed, check them for condition and replace them if they have carbon deposits (especially if the carbon is oily). If you have conventional ignition (points, condenser, rotor), rub a small piece of match book cover between the points to clean them. Then remove the coil lead from the center of the distributor cap and hold it 1/4” from the head or block while turning the engine over. Check for a strong secondary arc which can be stretched to at least 3/8”. Note: linked products above are for late model motors, see early model section for corresponding parts.
4) FUEL: With clean filters (primary and secondary), carefully remove the main passage plug or bowl drain from the carburetor and pump enough fuel through the system and into a clean glass jar to insure perfectly clean fuel. Reinstall the main passage plug or bowl drain and pump for an additional 5 or 10 seconds to re-prime the carburetor. The priming lever on mechanical pumps can be used in this step.
Electric fuel pumps will need to have a jumper wire installed across the oil safety switch so the pump will run by turning on the ignition switch. In electric fuel pump systems, it's very convenient to install a second electric pump upstream from the primary filter with a manual switch to use in this step. The second pump can also serve as an emergency back-up in case the primary fuel pump fails.
NOTE: One of the more useful side effects of 10% ethanol fuel is that it dissolves varnish build-up within older fuel systems. If you discover orange colored crud moving through your fuel system, repeat the above step and be prepared to check and replace filters several times during the season. In most cases, varnish build-up will be completely removed after several additional filter changes.
For the first start of the season, we recommend keeping the raw water through-hull valve closed until the engine starts in order to avoid any possibility of water flowing back into the exhaust manifold should the engine prove to be a bit hard starting. In fact, if you know that your particular exhaust system is problematic in terms of allowing water to flow back into the exhaust manifold, it makes sense to follow this suggestion permanently.
Hoping the 2010 season will be the best ever for you and your sailing companions,
Don Moyer
|
|
www.moyermarine.com
Universal® is a registered trademark of Westerbeke Corporation
Copyright 2018 Moyer Marine, all rights reserved |