|
In This Issue:
|
| Troubleshooting |
| New products! |
|
|
|
|
|
|
|
|
|
|
|
|
|
|
|
|
|
|
|
|
| Greetings to our Atomic 4 customers, and welcome to our September 2011 email newsletter. We have compiled the following information that we hope you find helpful. For a complete listing of our Atomic 4 parts & services, you may visit www.moyermarine.com or call Ken at our phone parts line, 610-421-4436. |
TROUBLESHOOTING CONCEPTS to use when an engine won't start or shuts down
|
Narrow the playing field: It helps greatly if you can determine early in the process whether the engine won't start (or shuts down) due to lack of fuel or lack of ignition. In cases where an engine will NOT start immediately after an unexpected shut down, the following items are good starting points:
IGNITION: Remove the coil lead from the center of the distributor cap and hold it close to the head while someone turns the engine over on the starter. There are other methods that can be used for checking ignition, but this one gives you the ability to evaluate the strength of the secondary discharge. Most healthy ignition systems will produce a 1/2" to 3/4” arc from the coil lead to the engine head or block. Note that this quick check does not address the secondary components downstream of the coil lead (rotor, cap, wires, & plugs). However, when an engine suddenly shuts down for no apparent reason, the problem is hardly ever in one of those components.
FUEL: If you have a good secondary arc from the coil lead, remove the flame arrestor housing and try to start the engine using starting fluid. If the engine springs to life and then stops as soon as soon as you quit with the starting fluid, the problem is pretty obviously fuel starvation.
In cases where an engine starts too soon after an unplanned shutdown to perform the above checks, you're more or less stuck with the law of probability, coupled with a very focused analysis of the symptoms. If the engine restarts immediately, the problem is most likely in the ignition system. Fuel systems (especially the carburetor) do not have much of a capability of shutting the engine down in such a way that would allow you to start it immediately.
Looking closely at symptoms, they can usually be divided into categories of “soft” or “hard”. Soft shutdowns involve brief hesitations that become more frequent and closer together as the engine quits. Hard shutdowns resemble someone inadvertently turning off the ignition switch. If you are standing somewhere on the boat during a hard shutdown, you'll probably find yourself being thrown gently forward. Soft shutdowns are more often fuel related (if the engine feels like it's running out of gas, it probably is), and hard shutdowns are most often ignition related (and approximately 90% of the time are within the primary system).
There's a sub-category of hard shutdowns which includes shutdowns that are not only hard, but “irritatingly rough”, rapidly stopping and starting, and sometimes accompanied by mild backfiring or popping. These symptoms will usually portend a coil failure, or perhaps a loose condenser.
Don't be afraid to consider circumstantial evidence in narrowing the playing field: When an engine works perfectly OK on Monday, but has a serious problem on Wednesday, and no one touched the engine, the playing field is narrowed considerably and includes a rather short list of possibilities: Corrosion forming on electrical connections, critters building nests in exhaust systems, corrosion forming on the contact surfaces of points, etc. By comparison, things like coils, fuel pumps, and condensers, are NOT good examples of things that can fail while the engine was just sitting there.
If a problem occurs in the immediate aftermath of maintenance work, it's very likely that something within the maintenance work is involved in the problem. This is contrary to much of the conventional wisdom among the Atomic 4 fleet which goes something like this: “I just replaced everything in the ignition system, so the problem can't be in the ignition system.”
Conversely, whenever an engine does run OK for a reasonable amount of time AFTER a particular fix was executed (significantly longer than the time period between failures in the original scenario), it usually starts the clock over again in answering the question: What was done since the engine last ran OK, and new causes can legitimately be considered.
Diagnose, diagnose, and diagnose: Even after narrowing the playing field as much as possible, unless you're in a dire emergency situation, avoid the urge to go for a quick fix. You really can't fix a problem until you determine what's wrong. Interestingly, the tendency to let fixing get ahead of diagnostics seems a bit strange considering the wide spread acceptance of the “If it ain't broke, don't fix it” concept.
The one place where the If it ain't broke, don't fix it rationale is truly relevant is in troubleshooting. Yet, even the most ardent supporters of that concept frequently fall prey to picking up their tools and begin fixing everything in sight at the first sign of trouble. The problem with quick fixes is that they're usually unproductive, and more importantly each new fix has the same probability of error as any other item of maintenance work. This means that by the time we at MMI are invited to the party, we frequently have to sort through at least one new problem (frequently more) before getting back to addressing the original failure.
A common example of premature fixing involves the changing of fuel filters during troubleshooting based solely on the fact that the filter hadn't been changed in quite a while. Air is frequently introduced into the fuel supply system when a filter is changed (particularly when changed in haste), which creates a secondary problem of fuel starvation. The suspicion of fuel starvation in turn will frequently lead to the assumption that the fuel pump is defective, and by the time we get our first call for help, the request will be to help to determine what else could be wrong with the fuel supply system (when the new fuel pump didn't solve the problem). All this of course delays the discovery of the real problem which might be something in the ignition system had the playing field been properly narrowed down.
SPECIFIC DIAGNOSTICS: Here are a few specific diagnostic ideas to add to your current list after narrowing the playing field:
IGNITION: Remembering that 90% of ignition problems relate to a breakdown somewhere within the primary system, connect a jumper wire (any 12 or even 14 gauge wire will do) from the big battery cable on the starter solenoid directly to the primary terminal on the coil (the small terminal that receives power from the ignition switch). If the engine performs OK as long as this jumper is installed, you'll have to determine where the problem is in the circuit leading from the big battery cable on the starter solenoid, through the ignition switch and back to the positive terminal of the coil. Look for corrosion in any quick disconnects, fuses, and of course a failure within the ignition switch itself.
NOTE: Installation of the jumper wire in the preceding paragraph is exactly the same thing as turning on the ignition switch, which means that you cannot leave the wire installed at any time other than when you're actually running (or trying to start) the engine, or you'll burn up the coil or electronic ignition system.
If you have a voltmeter on board, connect it between the positive terminal of the coil and ground while turning the engine over. You should see the voltage jump between full battery voltage and approximately 1 or 2 volts less each time the points (or electronic ignition) open and close the primary circuit to the coil. The amount of voltage drop each time the primary circuit is energized is determined in large part by the gauge and length of the primary circuit between the engine and the cockpit. This test is easier to interpret if you happen to have an analog meter and if you can turn the engine over by hand. If the voltage at the primary terminal of the coil remains at full battery voltage, the primary circuit is never being closed. If the voltage remains a volt or two less than battery voltage, the primary circuit is continuously energized so you can look for a short somewhere in the circuit. Remember that for a good secondary discharge the primary circuit must not only close, it must open and close.
FUEL: Connect a jumper wire across the oil safety switch if one is installed and see if the pump clicks when the ignition switch is turned on in the cockpit. It's almost always the case that when an electric fuel pump clicks, it's working. Electric fuel pumps usually fail by shorting out internally.
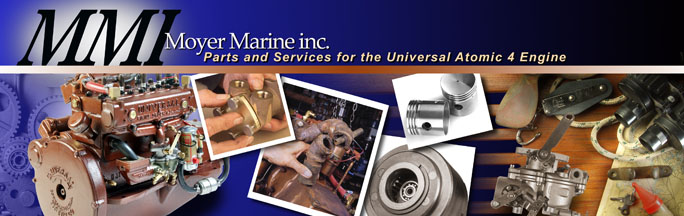
A mechanical fuel can be quick checked by working the priming lever. If it becomes completely free and stays that way after a couple strokes of the lever, the fuel pump is probably OK, meaning that it's holding pressure against the float valve in the carburetor.
If an engine stops after 30 to 60 minutes of running satisfactorily, remove the fill cap on the fuel tank to see if the vent line may have become clogged.
If you've installed a rubber priming bulb just downstream from the tank, you can use it diagnostically by giving it a couple good squeezes. If you can keep the engine running by squeezing the priming bulb you can look for a blockage somewhere in the fuel supply system (and yes, changing a fuel filter would finally make sense).
|
|